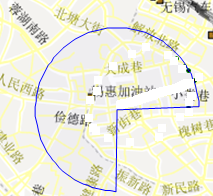
openlayers2.X画园形和扇形demo
OpenLayers有一个类: OpenLayers.Geometry.Polygon.createRegularPolygon, 查看源代码定义如下:
/**
 * APIMethod: createRegularPolygon
 * Create a regular polygon around a radius. Useful for creating circles
 * and the like.
 *
 * Parameters:
 * origin - {<OpenLayers.Geometry.Point>} center of polygon.
 * radius - {Float} distance to vertex, in map units.
 * sides - {Integer} Number of sides. 20 approximates a circle.
 * rotation - {Float} original angle of rotation, in degrees.
*/
OpenLayers.Geometry.Polygon.createRegularPolygon = function(origin, radius, sides, rotation) {
var angle = Math.PI * ((1/sides) - (1/2));
if(rotation) {
        angle += (rotation / 180) * Math.PI;
    }
var rotatedAngle, x, y;
var points = [];
for(var i=0; i<sides; ++i) {
        rotatedAngle = angle + (i * 2 * Math.PI / sides);
        x = origin.x + (radius * Math.cos(rotatedAngle));
        y = origin.y + (radius * Math.sin(rotatedAngle));
        points.push(new OpenLayers.Geometry.Point(x, y));
    }
var ring = new OpenLayers.Geometry.LinearRing(points);
return new OpenLayers.Geometry.Polygon([ring]);
};
这个类用于画一个以origin为圆心, 以radius为半径的多边形, rotation则是画圆该多边形时的的起始角.
var angle = Math.PI * ((1/sides) – (1/2)); // 数学里的起始角应该是以正东方向为0°, 逆时针旋转为正的, 而这里多加了Math.PI*(1/2), 所以这个类中, 当rotation=0时, 是从正南方向画起,逆时针方向为正画多边形, 当sides=20时,这个多边形将类似于一个圆.
从代码可以看出来, 它就是以radius为半径,围绕origin找sides个点,然后将这些点连接起来组成一个多边形.
那么如果我们要画一个扇形, 那就不要让这些点分布在360°里了, 比如, 如果我们想画一个120°的扇形, 那么就让这sides个点分布在这120°的范围里.
改写后的代码如下:
/**
 * APIMethod:
 *
 * Parameters:
 * origin - {<OpenLayers.Geometry.Point>} center of polygon.
 * radius - {Float} distance to vertex, in map units.
 * sides - {Integer} Number of sides. 20 approximates a circle.
 * rotation - {Float} original angle of rotation, in degrees.
*/
OpenLayers.Geometry.Polygon.createRegularPolygonCurve = function(origin, radius, sides, rotation) {
var angle = Math.PI * ((1/sides) - (1/2));
if(rotation) {
        angle += (rotation / 180) * Math.PI;
    }
var rotatedAngle, x, y;
var points = [];
for(var i=0; i<sides; ++i) {
var an = i*((360 - rotation)/360); // 注: 主要是这里
        rotatedAngle = angle + (an * 2 * Math.PI / sides);
        x = origin.x + (radius * Math.cos(rotatedAngle));
        y = origin.y + (radius * Math.sin(rotatedAngle));
        points.push(new OpenLayers.Geometry.Point(x, y));
    }
  //当rotation!=0时,要将圆心与扇形的起点和终点连接起来,构成扇形的两个边
    if(rotation!=0){
        points.push(origin);
    }
var ring = new OpenLayers.Geometry.LinearRing(points);
return new OpenLayers.Geometry.Polygon([ring]);
};
这样画出来的扇形, 也是以正南方向为0°, 逆时针旋转为正画多边形的, rotation则是扇形的起始角, 也就是这个扇形总是以正南0°为终点.
画扇形的openlayers实例代码如下:
    var vectorLayer = new OpenLayers.Layer.Vector("扇形");
    var origi_point = new OpenLayers.Geometry.Point(lon,lat);
    var circle = new OpenLayers.Geometry.Polygon.createRegularPolygonCurve(origi_point,0.0100,80,90,origi_point);
    var polygonFeature = new OpenLayers.Feature.Vector(circle);
    vectorLayer.addFeatures([polygonFeature]);
    map.addLayer(vectorLayer);
效果如下:

原文:http://www.cnblogs.com/lingxue3769/archive/2011/11/01/2231409.html
以上的demo貌似有问题,这里推荐使用如下代码绘制扇形的才正确:
/**
 * APIMethod:OpenLayers绘制扇形的接口扩展
 * @param origin 圆心
 * @param radius 半径
 * @param sides 边数
 * @param r 弧度
 * @param angel 旋转角度(扇形右边半径与x正向轴的角度)
 * @returns {OpenLayers.Geometry.Polygon}
 */
OpenLayers.Geometry.Polygon.createRegularPolygonCurve = function(origin, radius, sides,r,angel) {
    var rotation = 360 - r;
    var angle = Math.PI * ((1/sides) - (1/2));
    if(rotation) {
        angle += (rotation / 180) * Math.PI;
    }
    var rotatedAngle, x, y;
    var points = [];
    for(var i=0; i<sides; ++i) {
        var an = i * ((360 - rotation) / 360);
        rotatedAngle = angle + (an * 2 * Math.PI / sides);
        x = origin.x + (radius * Math.cos(rotatedAngle));
        y = origin.y + (radius * Math.sin(rotatedAngle));
        points.push(new OpenLayers.Geometry.Point(x, y));
    }
    if(rotation!=0){
    points.push(origin);
    }
    var ring = new OpenLayers.Geometry.LinearRing(points);
    ring.rotate(parseFloat(r)+90+parseFloat(angel),origin);
    return new OpenLayers.Geometry.Polygon([ring]);
};转载自:https://blog.csdn.net/allgis/article/details/42871843


