angular4总结项目中的知识点-leaflet相关调用,组件传值看下一章
1. ng-template 是angular4中的用于获取#id的值,例子如下:
<ng-template let-col let-monitor=“rowData” pTemplate=“body”>
<input #chk type=“checkbox” (change)=“regularChecked(monitor,chk)” />
</ng-template>
2.如果用到父子组件传值,父组件中用到子组件nc-overlay-panel等
<nc-overlay-panel class=“monitor-panel” [panelTitle]=“chartPanelTitle” [show]=“true” >
</nc-overlay-panel>
子组件nc-overlay-panel中要写入类似router-outlet类似的占位符
<div class=“overlay-panel” *ngIf=“show”>
<!– content –>
<div class=“overlay-panel-content”>
<ng-content></ng-content>
</div>
</div>
3. arcgis发布的服务图片切片,已经包含经纬度,无须重新定位图片到地图上
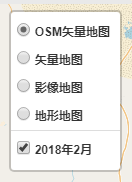
4. 添加地图右上角条件,切片条件的tianjia,和内容,效果图如图所示:

在leafletservice中定义_layersControl
if (leafletOptions.layersControl) {
this._layerControl = this._L.control
.layers(layers.baseLayers, layers.overlays, { collapsed: true })
.addTo(this._map);
}
addOverlay(layer: any, layerName: string) {
this._layerControl.addOverlay(layer, layerName);
}
const layer1 = L.esri.tiledMapLayer({
url:””,
maxZoom: 19
});
setTimeout(() => { //必须要使用上setTimeout(),
this.leafletService.addOverlay(layer1, “2018年2月”);
}, 500);
5. 往地图定位图标中加入id属性
const marker = L.marker(
[Number(item[“10.2”]), Number(item[“20.1”])],
{ icon: “url” }
);
//==往marker中加入id和type属性==
Object.defineProperties(marker, {
id: {
value: 1
},
type: {
value: “小武”
}
});
6. 地图上调到指定位置,可以定位很多定位集中的地方
//把所有的marker全部添加到layer集合中
this.heatMarkerLayer.addLayer(marker);
//把layer集合添加到地图上
this.leafletService.map.addLayer(this.heatMarkerLayer);
//地图定位到指定地点
this.leafletService.zoomToExtent(
this.leafletService.getLayerBounds(this.heatMarkerLayer)
);
zoomToExtent(extent: any) {
this._map.flyToBounds(extent);
}
7. 从后台请求的值分别赋值
//==分别对应element中的Time,DispName等属性==
const { Time, DispName, HumanHotspotId } = element;
8 触发定位图标的点击事件
//==fire() :触发指定类型的事件。你可以提供一个数据对象——监听器对象的第一个参数应该包含它的属性。==
layer.fire(“click”);
9. 禁止leaflet地图的拖拽事件
//==拖拽地图事件给禁止==
this.map.dragging.disable();
10. 地图移除放大缩小的+、-号
zoomControl: false
转载自:https://blog.csdn.net/qq_34790644/article/details/80179457


