geoserver官网–OWS
目录
The first step in creating our plug-in is setting up a maven project for it. The project will be called “hello”.
- Create a new directory called hello anywhere on your file system.
- Add a maven pom called pom.xml to the
hello directory:
<?xml version="1.0" encoding="ISO-8859-1"?>
<project xmlns="http://maven.apache.org/POM/4.0.0" xmlns:xsi="http://www.w3.org/2001/XMLSchema-instance"
  xsi:schemaLocation="http://maven.apache.org/POM/4.0.0 http://maven.apache.org/maven-v4_0_0.xsd">

  <modelVersion>4.0.0</modelVersion>

  <!-- set parent pom to community pom -->
  <parent>
    <groupId>org.geoserver</groupId>
    <artifactId>community</artifactId>
    <version>2.2.0</version>
  </parent>

  <groupId>org.geoserver</groupId>
  <artifactId>hello</artifactId>
  <packaging>jar</packaging>
  <version>1.0</version>
  <name>Hello World Service Module</name>

  <!-- declare depenency on geoserver main -->
  <dependencies>
    <dependency>
      <groupId>org.geoserver</groupId>
      <artifactId>main</artifactId>
      <version>2.2.0</version>
    </dependency>
  </dependencies>

  <repositories>
    <repository>
       <id>opengeo</id>
       <name>opengeo</name>
       <url>http://repo.opengeo.org</url>
    </repository>
  </repositories>

</project>
-
Create a java source directory,
src/main/java under the
hello directory:hello/ + pom.xml + src/ + main/ + java/
Creating the Plug-in
A plug-in is a collection of extensions realized as spring beans. In this example the extension point of interest is a HelloWorld POJO (Plain Old Java Object).
- Create a class called HelloWorld:
import java.io.IOException;
import javax.servlet.ServletException;
import javax.servlet.http.HttpServletRequest;
import javax.servlet.http.HttpServletResponse;
public class HelloWorld {
public HelloWorld() {
// Do nothing
}
public void sayHello(HttpServletRequest request, HttpServletResponse response)
throws ServletException, IOException {
response.getOutputStream().write( "Hello World".getBytes() );
}
}
The service is relatively simple. It provides a method sayHello(..) which takes a HttpServletRequest, and a HttpServletResponse. The parameter list for this function is automatically discovered by the org.geoserver.ows.Dispatcher.
- Create an applicationContext.xml declaring the above class as a bean.
<?xml version="1.0" encoding="UTF-8"?>
<!DOCTYPE beans PUBLIC "-//SPRING//DTD BEAN//EN" "http://www.springframework.org/dtd/spring-beans.dtd">
<beans>
<!-- Spring will reference the instance of the HelloWorld class
by the id name "helloService" -->
<bean id="helloService" class="HelloWorld">
</bean>
<!-- This creates a Service descriptor, which allows the org.geoserver.ows.Dispatcher
to locate it. -->
<bean id="helloService-1.0.0" class="org.geoserver.platform.Service">
<!-- used to reference the service in the URL -->
<constructor-arg index="0" value="hello"/>
<!-- our actual service POJO defined previously -->
<constructor-arg index="1" ref="helloService"/>
<!-- a version number for this service -->
<constructor-arg index="2" value="1.0.0"/>
<!-- a list of functions for this service -->
<constructor-arg index="3">
<list>
<value>sayHello</value>
</list>
</constructor-arg>
</bean>
</beans>
At this point the hello project should look like the following:
hello/
  + pom.xml
  + src/
    + main/
      + java/
+ HelloWorld.java
+ applicationContext.xml
Trying it Out
- Install the hello module:
[hello]% mvn install
[hello]% mvn install

[INFO] Scanning for projects...
[INFO] ----------------------------------------------------------------------------
[INFO] Building Hello World Service Module
[INFO]    task-segment: [install]
[INFO] ----------------------------------------------------------------------------
[INFO] [resources:resources]
[INFO] Using default encoding to copy filtered resources.
[INFO] [compiler:compile]
[INFO] Compiling 1 source file to /home/ak/geoserver/community/hello/target/classes
[INFO] [resources:testResources]
[INFO] Using default encoding to copy filtered resources.
[INFO] [compiler:testCompile]
[INFO] No sources to compile
[INFO] [surefire:test]
[INFO] No tests to run.
[INFO] [jar:jar]
[INFO] Building jar: /home/ak/geoserver/community/hello/target/hello-1.0.jar
[INFO] [jar:test-jar {execution: default}]
[WARNING] JAR will be empty - no content was marked for inclusion!
[INFO] Building jar: /home/ak/geoserver/community/hello/target/hello-1.0-tests.jar
[INFO] [install:install]
[INFO] Installing /home/ak/geoserver/community/hello/target/hello-1.0.jar to /home/ak/.m2/repository/org/geoserver/hello/1.0/hello-1.0.jar
[INFO] Installing /home/ak/geoserver/community/hello/target/hello-1.0-tests.jar to /home/ak/.m2/repository/org/geoserver/hello/1.0/hello-1.0-tests.jar
[INFO] ------------------------------------------------------------------------
[INFO] BUILD SUCCESSFUL
[INFO] ------------------------------------------------------------------------
[INFO] Total time: 6 seconds
[INFO] Finished at: Fri Sep 21 14:52:31 EDT 2007
[INFO] Final Memory: 27M/178M
[INFO] -----------------------------------------------------------------------
-
Copy target/hello-1.0.jar into the
WEB-INF/lib directory of your GeoServer install -
Restart GeoServer
-
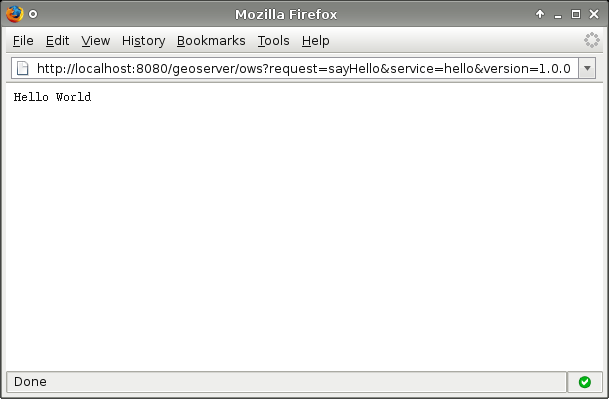
Visit:
http://<host>/geoserver/ows?request=sayHello&service=hello&version=1.0.0
- request
-
the method we defined in our service
- service
-
the name we passed to the Service descriptor in the applicationContext.xml
- version
-
the version we passed to the Service descriptor in the applicationContext.xml

Note
A common pitfall is to bundle an extension without theapplicationContext.xml file. If you receive the error message“No service: ( hello )” this is potentially the case. To ensure
the file ispresent inspect the contents of the hello jar present in the
targetdirectory of the hello module.
Bundling with Web Module
An alternative to plugging into an existing installation is to build a completeGeoServer war that includes the custom hello plugin. To acheive this a newdependency is declared from the core
web/app module on the new pluginproject. This requires building GeoServer from sources.
-
Build GeoServer from sources as described
here. -
Install the hello module as above.
-
Edit web/app/pom.xml and add the following dependency:
<dependency>
    <groupId>org.geoserver</groupId>
    <artifactId>hello</artifactId>
    <version>1.0</version>
</dependency>
-
Install the web/app module
[web/app] mvn install
A GeoServer war including the hello extension should now be present in thetarget directory.
Note
To verify the plugin was bundled properly unpack
geoserver.war andinspect the contents of the
WEB-INF/lib directory and ensure thehello jar is present.
Running from Source
During development the most convenient way to work with the extension is to runit directly from sources.
-
Setup GeoServer in eclipse as described
here. -
Move the hello module into the GeoServer source tree under the
communityroot module. -
Edit the community/pom.xml and add a new profile:
<profile> <id>hello</id> <modules> <module>hello</module> </modules> </profile> -
If not already done, edit web/app/pom.xml and add the followingdependency:
<dependency>
    <groupId>org.geoserver</groupId>
    <artifactId>hello</artifactId>
    <version>1.0</version>
</dependency>
-
From the root of the GeoServer source tree run the following maven command:
-
In eclipse import the new hello module and refresh all modules.
-
In the web-app module run the
Start.java main class to startGeoServer.
Note
Ensure that the web-app module in eclipse depends on the newly importedhello module. This can be done by inspeceting the
web-app moduleproperties and ensuring the
hello module is a projcet dependency.
转载自:https://blog.csdn.net/cehui115081/article/details/20605309


