Ubuntu从源码编译安装PostGIS
目录
前言
虽然Ubuntu可以用apt-get安装PostgresSQL和PostGIS,但是apt上面的版本大都比较旧,所以如果要安装较新的PostgresSQL/PostGIS需要从源码编译安装,不得不说这是一个复杂的过程,可能出现各种奇怪的bug,下面记录一下安装过程。
ps:下面只有PostGIS的安装过程,因为PostgreSQL以前装好了。
1.准备工作
下载想要的PostGIS包及其依赖软件包,不同版本的PostGIS需要的依赖包在版本上有所差异,具体请看官网。我安装的是PostGIS2.3.8,需要下载的包如下:
1.1 postgis
wget http://www.postgis.net/stuff/postgis-2.3.8dev.tar.gz
1.2 proj4
wget http://download.osgeo.org/proj/proj-4.9.3.tar.gz
1.3 gdal
wget http://download.osgeo.org/gdal/2.1.2/gdal-2.1.2.tar.gz
1.4 geos
wget http://download.osgeo.org/geos/geos-3.6.1.tar.bz2
1.5 JSON-C
wget https://github.com/json-c/json-c/archive/json-c-0.13.1-20180305.tar.gz
1.6 LibXML2
wget ftp://xmlsoft.org/libxml2/libxml2-2.7.2.tar.gz
1.7 iconv
wget https://ftp.gnu.org/pub/gnu/libiconv/libiconv-1.15.tar.gz
ps:当然也可以直接在官网点击下载
2.编译各包
2.1 解压各包
tar.gz的解决命令是tar -zxf xxx.tar.gz
tar.bz2的解压命令是tar -vxf xxx.tar.bz2
2.2 编译依赖包
各包的编译方法大同小异,以proj4为例
cd proj-4.9.3
./configure --prefix=/usr/local/proj4
make
make install
make installcheck
make clean
ps:–prefix中定义安装路径。
注:
- 如果提示权限不足请在所有命令前加sudo
- json-c编译前需要执行
sudo apt-get install git gcc clang libtool autoconf automake doxygen valgrind和sh autogen.sh - libxml2编译前需要安装
python-devel,用apt即可。
2.3添加ld信息
在/etc/ld.so.conf.d/下新建geos.conf文件并添加/usr/loca/geos/lib。
要为上面每个依赖库新建一个.conf文件并在文件内添加installed_path/lib
然后执行ldconfig
2.3编译PostGIS
 cd postgis-2.3.8dev
 ./configure --with-pgconfig=/usr/lib/postgresql/10/bin/pg_config --with-geosconfig=/usr/local/geos/bin/geos-config --with-gdalconfig=/usr/local/gadl/bin/gdal-config --with-xml2config=/usr/local/libxml2/bin/xml2-config --with-projdir=/usr/local/proj4 --with-jsondir=/usr/local/json --with-libiconv=/usr/local/libiconv
 make
make成功后会有PostGIS was built successfully. Ready to install.的提示,做到这里后面基本就没什么问题了,接下来就是安装postgis.
cd extensions
cd postgis
make clean
make
make install
cd ..
cd postgis_topology
make clean
make
make install
cd ..
cd postgis_sfcgal
make clean
make
make install

cd ..
cd address_standardizer
make clean
make
make install
make installcheck

cd ..
cd postgis_tiger_geocoder
make clean
make
make install
make installcheck
3.测试
连接到数据库执行
SELECT name, default_version,installed_version FROM pg_available_extensions WHERE name LIKE 'postgis%' or name LIKE 'address%';
如果出现以下结果说明安装成功:
| name | default_version | installed_version |
|---|---|---|
| address_standardizer | 2.5.2dev | 2.5.2dev |
| address_standardizer_data_us | 2.5.2dev | 2.5.2dev |
| postgis | 2.5.2dev | 2.5.2dev |
| postgis_sfcgal | 2.5.2dev | |
| postgis_tiger_geocoder | 2.5.2dev | 2.5.2dev |
| postgis_topology | 2.5.2dev |
如果要给一个数据库添加postgis支持,只在要在这个数据下执行
CREATE EXTENSION postgis
然后用
SELECT ST_SetSRID(ST_Point(-87.71,43.741),4326),ST_GeomFromText('POINT(-87.71 43.741)',4326)
验证,没报错就说明成功了。
4.安装过程中可能遇到的坑
4.1 could not load library “/usr/lib/postgresql/10/lib/postgis-2.3.so”: libjson-c.so.4: cannot open shared object file: No such file or directory
== 解决方案: == ln -s /usr/local/json/lib/libjson-c.so.4 /usr/lib `
ps:/usr/local/json/是你在上面安装json-c的路径。
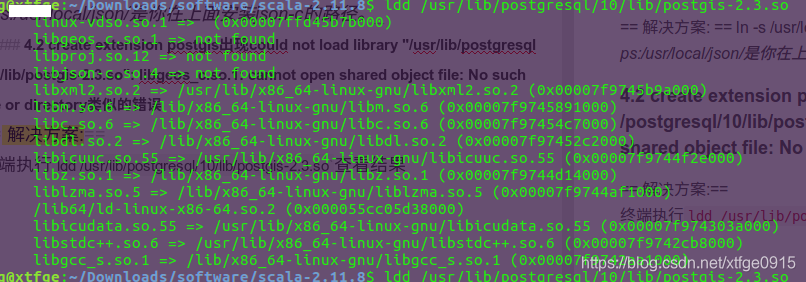
4.2 create extension postgis出现could not load library “/usr/lib/postgresql/10/lib/postgis-2.3.so”: libgeos_c.so.1: cannot open shared object file: No such file or directory类似的错误
== 解决方案:==
终端执行ldd /usr/lib/postgresql/10/lib/postgis-2.3.so查看结果
 发现在三个库是not found,把这些库链接到/usr/lib,比如:
ln -s /usr/local/proj4/lib/libproj.so.12 /usr/lib
ps:这些库都是前面安装的
转载自:https://blog.csdn.net/xtfge0915/article/details/84981666


