Openlayers 0:开始学习
概述:
openlayers用于在任何web页面显示动态的地图。
它可以显示地图标题,矢量数据和来自于任何来源的标记。
OpenLayers已经发展成超出单纯的所有类型的地理信息用途。
免费,开源的js代码,基于2-clause BSD License(FreeBSD)发布。
特点:
一:平铺瓦片图层(tiled layers)
支持从OSM,Bing,MapBox, Stamen 和你可以找到的任何其他XYZ资源 获取的瓦片。也支持非瓦片的图层和OGC mapping服务
Pull tiles from OSM, Bing, MapBox, Stamen, and any other XYZ source you can find. OGC mapping services and untiled layers also supported.
二:支持向量图层
绘制来自于GeoJSON,TopoJSON,KML,GML,Mapbox 向量的向量瓦片,和其他格式。
三:切边,快速并且支持移动处理
利用 Canvas2D,WebGL,和h5的新特性支持移动端处理。 使用相应组件创建轻量的定制的产品。
四:易于定制和扩展
直接使用CSS来为地图控制添加样式。链接到API的不同层面,或使用第三方库来定制和扩展功能。
起步代码:
demo代码:
<!doctype html> <html lang=”en”> 国际化设置,语言为英语 <head> <link rel=”stylesheet” href=”https://openlayers.org/en/v4.5.0/css/ol.css” type=”text/css”> 外联CSS <style> 内联CSS .map { height: 400px; width: 100%; } 设置map的高度为400px,宽度为100% </style> <script src=”https://openlayers.org/en/v4.5.0/build/ol.js” type=”text/javascript”></script>
加载外联js(openlayers框架js资源) <title>OpenLayers example</title> </head> <body> <h2>My Map</h2> <div id=”map” class=”map”></div> <script type=”text/javascript”> 内联js var map = new ol.Map({ 新建openlayers的 ol对象 target: ‘map’, layers: [ new ol.layer.Tile({ source: new ol.source.OSM() }) ], view: new ol.View({ center: ol.proj.fromLonLat([37.41, 8.82]), zoom: 4 }) });
传入对象参数:{target:‘map’,layers:[],view:new o1.view()} </script> </body> </html>
20171205继续学习:http://openlayers.org/en/latest/doc/quickstart.html
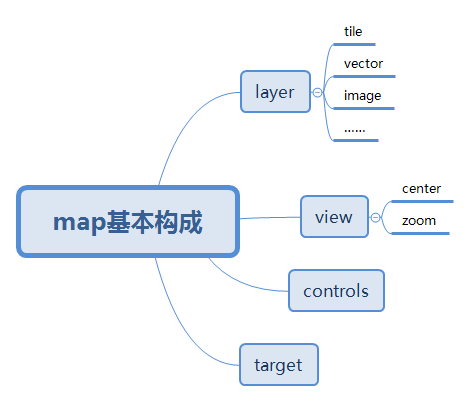
OpenLayers 的基本概念
Map(承载地图的对象)
var map=new ol.map({target:’map’})
或
var map=new ol.map();
map.setTarget(‘map’);
ol.map将DOM对象装填为一个ol的map对象,方便调用和操作
View(用来设置显示的 放大级别 和 放大步进)
map.setView(new o1.view({
center:[0,0],
zoom:2
}))
view定义了地图中心使用的坐标系统,和 地图分辨率计算使用的单位
如果不设置,默认地图中心使用的坐标系统为:EPSG:3857, 以米为单位
其中的zoom选线可以方便的自定义地图的分辨率
可用的放大级数由以下因素决定
1.maxZoom(默认为28),
2.zoomFactor(默认为2),
3.maxResolution(默认的计算方式为:该投影的有效范围装配一个256*256像素的瓦片)
- 启动时的放大级别为0,分辨率为maxResolution(投影有效范围装配出一个256*256像素瓦片) 的单位每像素
随后的方法级别是由 使用上一个放大级别除以zoomFactor(默认2)来计算出来的,直到达到maxZoom(默认28)
Source (地图源)
var osmSource=new o1.source.OSM();
ol.source.Source 子类用来设置一个图层的 数据源
可用的源有:
免费的收费的:OpenStreeMap Bing
OGC:WMS WMTS
矢量数据:GeoJSON KML
Layer(来自于其他数据源的一个可见数据表示图层)
var osmLayer=new ol.layer.Tile({source:osmSource});
map.addLayer(osmLayer);
OpenLayers有三种基本类型的图层:
ol.layer.Tile //瓦片
ol.layer.Image//图片
ol.layer.Vector//矢量数据
ol.Feature
import Feature from ‘ol/feature’;
A vector object for geographic features with a geometry and other attribute properties, similar to the features in vector file formats like GeoJSON.
Features can be styled individually with setStyle; otherwise they use the style of their vector layer.
一个带有地理特征并包含几何图形和其他属性的矢量对象,和矢量文件格式比如GeoJSON中的特征相似。特征可以使用setStyle独立的定制样式,另外也可以使用包含它们的矢量图层中的style
Note that attribute properties are set as ol.Object properties on the feature object, so they are observable, and have get/set accessors.
属性会被以ol.Object属性设置在特征的对象上,所以可以被看到,并带有响应的getter setter方法。
Typically, a feature has a single geometry property. You can set the geometry using the setGeometry method and get it with getGeometry. It is possible to store more than one geometry on a feature using attribute properties. By default, the geometry used for rendering is identified by the property name geometry. If you want to use another geometry property for rendering, use the setGeometryName method to change the attribute property associated with the geometry for the feature. For example:
特别的,一个特征拥有一个集合属性,可以使用setGeometry方法设置几何图形,或者使用getGeometry方法获取。一个特征可以使用属性来保存多以一个几何图形。默认的,用来渲染的多边形会被命名为geometry。如果你想使用其他的多边形属性来渲染,需要使用setGeometryName方法来改变带有geometry的属性。
var feature = new ol.Feature({//定义一个feature geometry: new ol.geom.Polygon(polyCoords),//定义用来渲染的geometry labelPoint: new ol.geom.Point(labelCoords),//其他带有geometry的属性 name: ‘My Polygon’//feature名字 }); // get the polygon geometry var poly = feature.getGeometry();//获取用来渲染的getmetry // Render the feature as a point using the coordinates from labelPoint feature.setGeometryName(‘labelPoint’);//将labelPoint(点geometry)设置为渲染用的geometry, // get the point geometry var point = feature.getGeometry();//点geometry已经被设置为默认的geometry
ol.Overlay
import Overlay from ‘ol/overlay’;
An element to be displayed over the map and attached to a single map location. Like ol.control.Control, Overlays are visible widgets. Unlike Controls, they are not in a fixed position on the screen, but are tied to a geographical coordinate, so panning the map will move an Overlay but not a Control.
是一个要在地图上面显示的元素,并且附在了一个地图位置,比如ol.control.Control.
Overlays是可见的小工具。和control不同的是,他们不是在屏幕上的一个固定位置,而是固定在一个地理坐标上,因此在移动地图的时候,Overlay也会跟着动,control不会。
Example:
var popup = new ol.Overlay({ element: document.getElementById(‘popup’) }); popup.setPosition(coordinate); map.addOverlay(popup);
ol.Observable
import Observable from ‘ol/observable’;
Abstract base class; normally only used for creating subclasses and not instantiated in apps. An event target providing convenient methods for listener registration and unregistration. A generic change event is always available through ol.Observable#changed.
一个抽象基类,一般只用于创建子类而不具体实例化。一个事件目标提供了方便的方法,用于监听器的绑定和解绑。一个一般的 change 事件通过ol.Observable#changed总是有效
import Control from ‘ol/control/control’;
A control is a visible widget with a DOM element in a fixed position on the screen. They can involve user input (buttons), or be informational only; the position is determined using CSS. By default these are placed in the container with CSS class name ol-overlaycontainer-stopevent, but can use any outside DOM element.
一个control组件是一个可见的工具,包含一个DOM元素,固定在屏幕的一个位置。他们可以包含用户的按钮,或者近用于显示信息。位置使用CSS来设置,默认的使用
ol-overlaycontainer-stopevent类名.
This is the base class for controls. You can use it for simple custom controls by creating the element with listeners, creating an instance:
var myControl = new ol.control.Control({element: myElement});
and then adding this to the map.
The main advantage of having this as a control rather than a simple separate DOM element is that preventing propagation is handled for you. Controls will also be ol.Objects in a ol.Collection, so you can use their methods.
control相对于直接使用DOM定位最大的优势是已经阻止了事件的冒泡,另外也可以使用ol.Objects 和 ol.Collection类的方法
You can also extend this base for your own control class. See examples/custom-controls for an example of how to do this.
也可以基于此,扩展ol类似的功能语法
ol.interaction.Select
import Select from ‘ol/interaction/select’;
Interaction for selecting vector features. By default, selected features are styled differently, so this interaction can be used for visual highlighting, as well as selecting features for other actions, such as modification or output. There are three ways of controlling which features are selected: using the browser event as defined by the condition and optionally the toggle, add/remove, and multi options; a layers filter; and a further feature filter using the filter option.
Selected features are added to an internal unmanaged layer.
Select类是用于选择矢量特征的交互工具,默认的,选中的特征会被设置成特别的样式,这样这个特征就可以被用于高亮显示,同时选择特征也可以用于其他的用途,例如修改或者输出。有三种方法来控制哪些特征被选中:
1.使用浏览器condition定义的事件,
转载自:https://blog.csdn.net/zw3413/article/details/88202032


